|
|

|
Web Phone Manager: Phone Notification
Phone notification is an option allowing you to be called at one (or more) phone number(s) you specify when voice mail is left for you. When enabled and properly configured, phone notification causes the voicemail system to phone you when UO voicemail is left for you. You can also configure phone notification for the use of a paging device, which allows you to receive a page when new voicemail arrives.
Please note that the number at which you wish to be reached should be a UO extension or local to the Eugene calling area.
Web phone manager (aka "WPM") is a web interface to your voicemail account settings, accessible from UO networks, availailable at https://voiceweb.uoregon.edu. This interface is available to anyone with a voicemail account. The configuration described below uses this web interface to demonstrate setting up phone notification.
Please note that under some conditions, sending phone notifications to wireless providers or other non-UO service providers can incur fees from that provider. Under no circumstances will the University of Oregon Telecommunications Services Department be responsible for fees incurred from using voicemail notification features such as the one described here. If you have any questions, either check with your service provider if any fees apply or stay within resources provided to you by the UO (such as your university phone number and Eugene numbers).
- Set up phone notification
- Test that it works
And we recommend you also read up on:
- How notification works
- How to make it stop calling you
- More notification tips (notify only from a specific caller, setting up a digital pager, more...)
|
| |
- Set up phone notification
Begin by logging into the web interface (only available from a UO network):
- Open https://voiceweb.uoregon.edu
- Enter your extension and security code.
- Once logged in, click on the Notification Settings link on the left.
- Then, click on the phone tab
 - note NOT the Email tab, make sure it's the Phone tab! - note NOT the Email tab, make sure it's the Phone tab!
When you set up phone notification, it's probable you'll want something similar to what we describe here. Note these are sometimes not the defaults you're offered when setting up this feature.
- Check the Enable Phone Notification checkbox.
- Notify status: set to All.
- Message types: check Include Voice Msgs.
- Hours: start at 08:00 stop: at 17:00.
- For phone notification, the default starts at 00:00 and ends at 23:59. If you would like to be notified any time, leave it as this setting, otherwise, change it to the hours you would like to receive calls (example 8 a.m. to 5 p.m. would be Start: 08:00 and Stop: 17:00).
- Days: Mon through Fri.
- If you want to be notified every day, check the boxes labeled Sat and Sun. Change as needed for your requirements.
Here's a picture of what you might want the top half to look like:
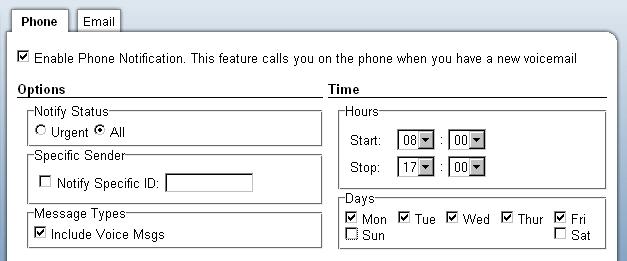
Note: You probably will want to leave the Notifiy Specific ID box unchecked. This setting is meant to notify you only when only one specific caller leaves you a message, and notify only for that caller. More info on this option is here
Now, you need to tell the voicemail system where to try to reach you:
- Under the Telephone Number label put a valid phone number in the format listed (five-number UO extension example: 69999; local Eugene number example: 5551212). Note that for off-campus numbers like your home or cell phone, when you enter them in this form you don't put a leading "9", just enter the 10-digit number.
- Leave Type as Normal.
- Leave PIN Number blank, as it relates to pagers and other phones that require a PIN number when called.
- The wait time is how long it wait before retrying the telephone number or trying the next number in the list. The voicemail will call the first number in the Call List immediately after the voice message is left, so the Wait time does not refer to the first number.
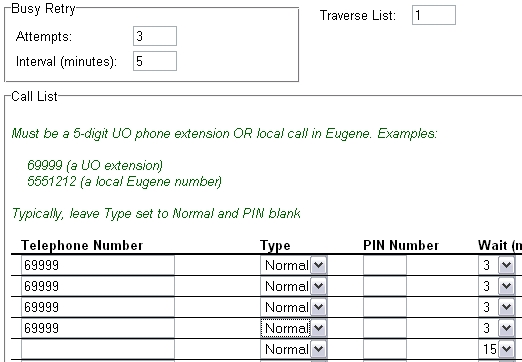
Here's an example with the settings listed above:

- Be sure and click the
 button to save any changes you've made so far. button to save any changes you've made so far.
- Test that phone notification is working:
- Call your desk phone from either a neighboring phone or your personal local cell phone and leave a message.
- Record a test message.
- Hang up the phone, and wait for the call to go to the location you specified. The voicemail system should call your phone immediately and show as "61111" on your caller ID.
- If you do not receive a call from 61111, make sure you entered your phone number correctly on the website (no spaces or dashes, no leading "9" required to dial offsite), and the settings on the phone notification settings page match the picture above. If you're still having troubles:
- Try sending to your work station extension, if you did not already use that.
- Try calling your desk phone with a different number (neighboring desk, cell phone) and leaving a message.
- If you're trying to be notified at an off-campus phone number, try dialing that number from your UO extension. Note that in voicemail you don't have to dial a "9" to reach a local off-campus number, but from your extension you do. If you're prompted for an authorization code or the call is denied, your number may not be local and therefore won't work with phone notification. You might try another number or consider email notification instead.
- If those two steps do not work, contact Telecom for assistance (see below).
- How Notification Works or, how much notification do you need? An explanation of how voicemail uses the traverse list and Telephone number settings, and when it will try to notify you.
When a new voicemail comes in, and you have phone notification set, voicemail checks your "time" settings to see if it's within the days and hours you want to be notified. If not, you'll get no notification. The notifications DO NOT queue up. If a voicemail comes in during a time you don't want to be notified, you won't get notified.
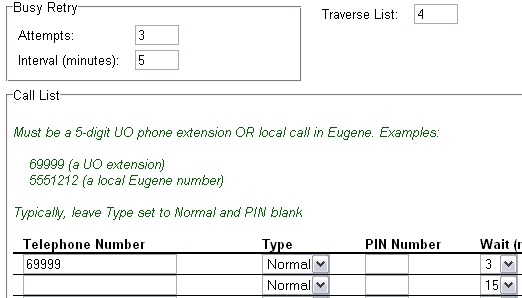
The "Traverse List" setting tells voicemail "go through my Telephone Number list this many times until you can reach me". Listing a single telephone number where you want to be called, and setting Traverse List to "4", is functionally equivalent to having Traverse List set to "1" and listing your telephone number four times. That is, with both examples here, voicemail will try to call you every 3 minutes up to four times. If it can't reach you by then, it gives up.
- Make it stop! Or, how to tell voicemail to stop trying to call you:
Let's say you've set phone notification as in the example above, where it'll try to call you at 69999 up to four times. If you get a voicemail message, and callxpress calls you, and you:
- Answer the call
- Enter your security code
- Listen to the message completely AND press either *3 to delete it or # to save it
Callxpress will assume it's notification duties are done re. that message and will not try to continue to reach you. That is, it will stop traversing your notificaiton list. Alternatively, you can simply dial in to voicemail and retrieve any new messages (again, making sure to either save or delete them by pressing # or *3, listening to them isn't sufficient to mark them as "read"). Once you have no more unread messages, callxpress will stop any notification attempts.
Here's what won't stop the notification:
- Listening to your message using the web Inbox. While this should work, it appears to be an unresolved defect in callxpress. Plan on using the telephone to listen to and either save or delete your new voicemail.
- Listening to any/all unread messages using the telephone but neglecting to either save them (pressing #) or delete them (pressing *3). Just listening to the entire message won't mark it as read, you must either save or delete. (We have a request in to the vendor to change this behavior in a future product release, but for now you have to either save or delete or the message is still flagged as unread).
- More notification tips
(click on the link to see detailed instructions).
- Have the voicemail system try to reach you only when a specific person calls you.
- Have the voicemail system try to reach you at multiple different numbers.
- Setting up a digital pager.
|
| |
- Have the voicemail system try to reach you only when a specific person calls you.
- Start by making sure that phone notifications are working for your account.
- Check the box in the Specific Sender field entitled Notify Specific ID.
- Enter the number of the person whose messages you would like sent to a phone other than your desk phone. The field should look as follows:

- Go down to the Personal Call List Options menu. Under Busy Retry select the number of attempts (Attempts ).
- Select the amount of time between retry's (Interval (minutes) ).
- Set Traverse List to the number of times you would like your other phones to be called. 1 would mean that your other phones would be called once each.
- The settings should look as follows at default.

- If you wanted to limit when you'd receive voice messages, you could use the Hours and Days form elements to limit when these notifcations would work.
- Having this set will mean that whenever this number leaves a message at your desk phone, your voicemail will call another number to have the message sent. To learn how to have the voicemail system call multiple phones, continue reading.
|
| |
- Have the voicemail system try to reach you at multiple different numbers.
- Start by making sure that phone notifications are working for your account.
- Set up the Call List with numbers at which you'd like to be called, in order of preference. For example, you can enter your cell phone number, house number or work cell phone number. Callxpress will work down the list in order, so put your preferred number first.
- Leave the Type as Normal and PIN Number blank for a regular telephone call. If you're trying to set up notification to a pager these settings are useful, otherwise they're left as "normal" and blank, respectively.
- The Wait time specifies how long to wait before trying the next number in the list
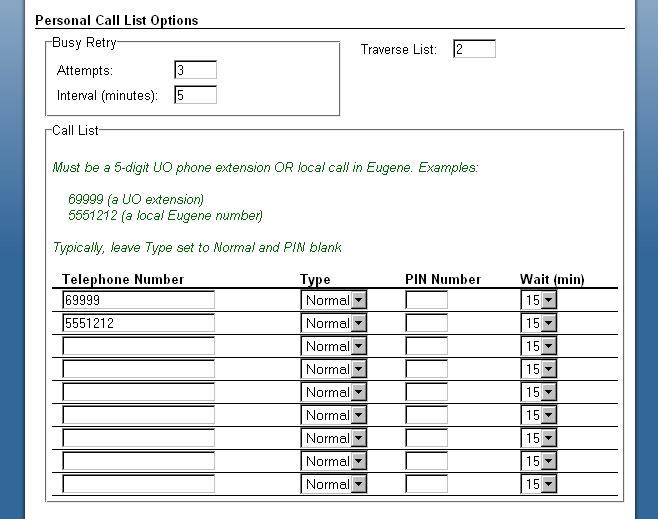
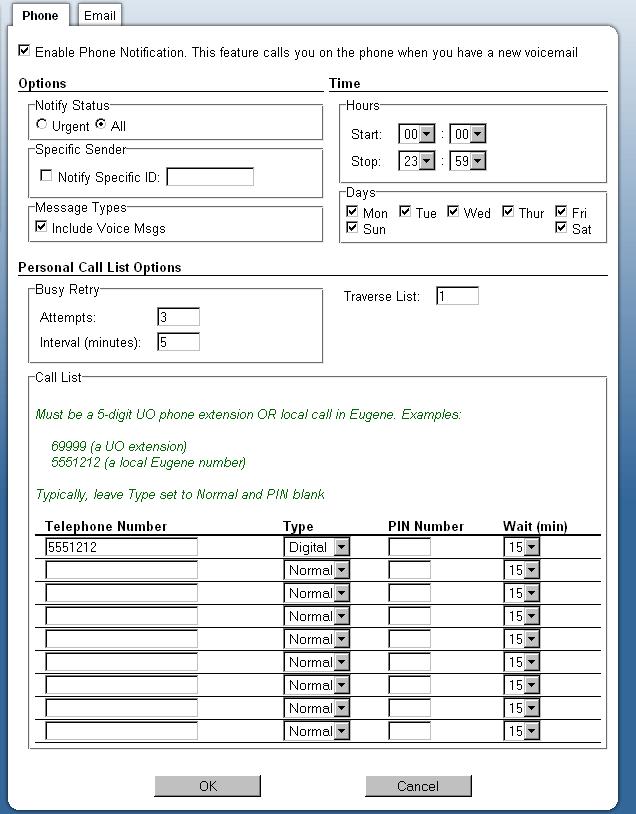
- Here's an example that's configured to:
- try 69999 immediately. If unsuccessful wait 15 minutes then
- try 5415551212. If unsuccessful wait 15 minutes then
- do the whole thing one more time (Traverse list is set to 2, that is, run through the list twice)
|
| |
- Setting up a digital pager.
- Set up basic notification, as shown above.
- Under the Telephone Number label put your pager number in the format listed (five-number UO extension example: 69999; local Eugene number example: 5415551212). NOTE: Local numbers must be entered as 10 digits (the picture above is missing 541 area code).
- Change Type from Normal to Digital.
- Leave PIN Number blank, unless your pager service requires a PIN Number to access it.
- The default Wait (min) is 15 minutes, which dictates how long the voicemail system waits until it traverses the list and tries calling the numbers again. Set this to your desired wait time.
- The example below shows notification set up for a pager on 5415551212:
- Remember to click the button when complete.
- Now if you get a voicemail on your desk phone, your pager will receive a page that will display your desk phone's extension.
For example: If your number is "(541)346-9999," your pager will read "69999."
Important things to remember:
- Voice calls can incur fees from your wireless provider. UO Telecom will not be responsible for fees incurred for voice messages. If you have any questions about your wireless contract and fees associated, you should contact your wireless provider before trying to set any of these services up.
|
| |
If you have any questions on this, need assistance, or for more information, use the contact information below to reach Telecom Services directly.
|
|