|
|

|
Avaya 9600 IP Telephone
Getting Started:
- Answering and Making Calls
- Creating and Saving Contacts
- Using the Call Log
- Conference Calls
- Forwarding Calls / Parking Calls and Picking Up
- Send All Calls
- Other Basic Information
- Advanced Features
|
| |
- Answering and Making Calls
Answering Calls:
- If you are not already on another call, lift the handset
- Or press the corresponding Call Line button, located right of the screen. If you only press the button without lifting the handset, it will put you on speaker phone with the incoming call.
- If you would like to use a different method:
- Press the Speaker
 button to answer with the Speaker phone. button to answer with the Speaker phone.
- Press the Headset
 button to answer with your connected headset. button to answer with your connected headset.
Making Calls:
- Start by either:
- Lifting the handset;
- Pressing the Headset button;
- Pressing the Speaker button; or
- Pressing the
 button if an idle Call Line is available. button if an idle Call Line is available.
- Then dial the number you want to enter.
- Remember to dial 9 for an outside number.
Putting a Call on Hold:
- While in a call, press the Phone
 button to get to the main Phone menu. button to get to the main Phone menu.
- Press the corresponding Call Line button to choose to call which you would like to put on hold.
- Press the Hold softkey.
- Press the Resume softkey to take the call off of hold.
Transferring a Call:
- While in a call, press the Phone button to get to the main Phone menu.
- Press the Transfer softkey. Then either:
- Press the Call Log softkey to find the number in the list of recent calls;
- Press the Contacts softkey to find a person; or
- Dial the phone number with the dialpad.
- Press the Complete softkey to finish the transfer.
Back to Top
|
| |
- Creating and Saving Contacts
Creating Contacts
- Press the Contacts
 button. button.
- Press the More softkey.
- Press the New softkey.
- Enter the name using the Dialpad.
- To enter characters using the Dialpad:
- Press the number key that corresponds to the ltter or number you want to enter until the letter or number is displayed.
- Example: For the letter F, you must press the 3 key three times.
- Remember to pause before entering the next character if the characters are on the same key.
- Enter remaining letters or numbers.
- To enter a space, press 0.
- Press the Bksp softkey to delete the last character.
- When finished, press the button or the OK softkey.
- Once finished with the name, press the Down arrow to select the phone number, and proceed to enter it.
- Press the Save softkey or the button.
Calling Contacts
- Press the Contacts button.
- Scroll up or down to select the person or number you want to call.
- Press the Call softkey or the button.
Back to Top
|
| |
- Using the Call Log
Making a Call
- Press the Call Log
 button. button.
- Note: If the Call Log button is glowing red, you have a missed call.
- Press the Left arrow or Right arrow to view the following different call types:
- All Calls
- Missed Calls
- Answered Calls
- Outgoing Calls
- After selecting the type of call, press the Up arrow or Down arrow to select the person or number from the previous selection.
- Press the button or the Call softkey.
Adding a Number from the Call Log to the Contact List
- Press the Call Log button.
- Find the number through the process listed above.
- Press the +Contact softkey.
- To edit the name or number, press the Up arrow or Down arrow to select the corresponding field, then enter the name, number or type of phone entry, then type the name or number using the Dialpad.
- Press the Save softkey or the button.
Back to Top
|
| |
- Conference Calls
Making a Conference Call
- Make your initial call by either finding the contact in the Contact List or by dialing the number.
- Press the Phone button to ensure that you are in the main Phone menu.
- Press the Conference softkey. From this menu you can either:
- Press the Call Log softkey to find the number in the list of recent calls;
- Press the Contacts softkey to find a person; or
- Dial the phone number with the dialpad.
- Press the button or Join softkey to finalize the Conference.
Adding a Person on Hold
- While in a call, press the Phone button to ensure that you are in the main Phone menu.
- Press the Conference softkey. From this menu you can either:
- Scroll with the Up and Down arrows to select the call you would like to add.
- Press the Resume softkey.
- Press the Join softkey.
Dropping the Last Person
- While in a call, press the Phone button.
- Press the Details softkey.
- Scroll to the person you want to drop with the Up and Down arrows.
- Press the Drop softkey.
Back to Top
|
| |
- Forward and Parking/Picking Up Calls
Forwarding A Call
- Pick up the receiver and listen for a dial tone.
- Dial * 2.
- Enter Extension # to Forward to New #.
- Listen for Confirmation Tone (3 beeps)
- Hang up the receiver.
- Pick up the receiver and listen for a dialtone.
- Dial # 2 2.
- Listen for Confirmation Tone (3 beeps).
- Hang up the receiver.
Parking and Picking Up Calls
- Press the Hold softkey to park the call.
- Pick up the receiver of the phone where you want to pickup the call.
- Dial # 7 7.
- Dial the Extension where the call is currently Parked.
- Call should ring through.
Back to Top
|
| |
- Send All Calls
Through the Phone
- In the main menu, you can press SendAllCalls softkeys on the Left of the screen or at the Bottom of the screen to toggle SendAllCalls On or Off.
Calling the Phone
- You can also dial * 8 to set Send All Calls and # 8 8 to unset.
Back to Top
|
| |
- Other Basic Information
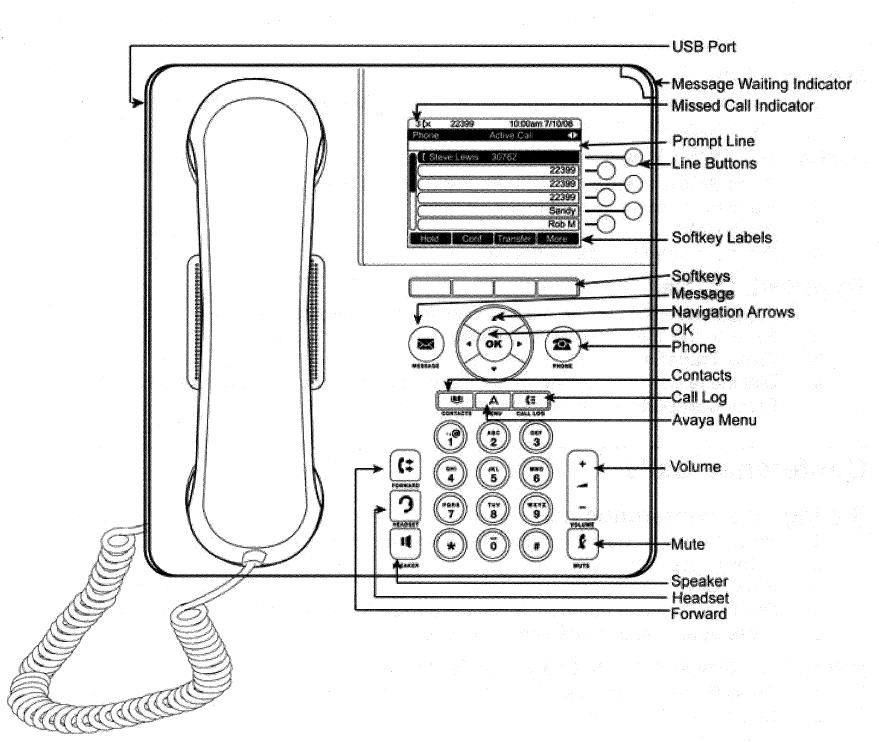
- Press the button to get back to the main phone screen at any time.
- The
 button will take you to voicemail. For more information on voicemail, see the voicemail reference. button will take you to voicemail. For more information on voicemail, see the voicemail reference.
- The white rectangular buttons under the screen are the “soft key” buttons; functions on these buttons change depending on what you’re doing.
- Each phone has 3 line appearances of the programmed number. That lets you take multiple calls, transfer calls, etc. We normally program these line appearances on the first three buttons.
- With the 9600, you can change these buttons by going to the Phone Menu > Options & Settings > Application Settings > Personalize Labels..., selecting the label and changing it visa vie the number pad.
Back to Top
|
| |
- Advanced Features
Voice Dialing
Note: This feature is used through the Contacts menu. You must first save a few phone numbers before you will be able to use this feature. You also must either use the Speaker or Headset function, the Voice softkey will not appear if you lift the handset.
- Start by ensuring that your handset is on the hook.
- Press the Contacts button.
- Press the Voice softkey.
- There will be a check mark behind the Voice softkey and you will hear a beep. The top of the screen will read "Speak the name you want to dial."
- Say the name as it is saved in your Contacts list.
For example: If you saved the name as "John Smith," say "John Smith" into your phone.
- The name will show up on the screen, the phone will wait for a second, and the call will go through.
Adjusting Brightness or Contrast
- Press the Menu button.
- Scroll to Options & Settings.
- Press or the Select softkey.
- Scroll to Screen & Sound Options.
- Press or the Select softkey.
- Scroll to and Select either Brightness or Contrast.
- Press or the Change softkey.
- Scroll to the right or left to decrease or increase respectively the brightness or contrast, based on which you decided to adjust in the Screen & Sound Options menu.
- Press the Save softkey.
Back to Top
|
| |
If you have any questions on this, need assistance, or for more information, use the contact information below to reach Telecom Services directly.
Portions of the information on this page are taken from Avaya's technical documentation. |
|