|
Voicemail: Managing Voicemail Lists
As with Audix, callXpress allows you to maintain voicemail lists, which makes it easier to send voicemail to many individuals at once. There are some differences in how you manage and use lists in callXpress than what you may have been used to in Audix. Note that callXpress refers to these voicemail lists as "Personal Distribution Lists".
- Request empty lists from Telecom
Unlike in Audix, where you could just create lists and start to manage them, in callXpress you first need to request lists from Telecom before you can use them. Telecom will assign you empty lists, at which point you can start to add recipients.
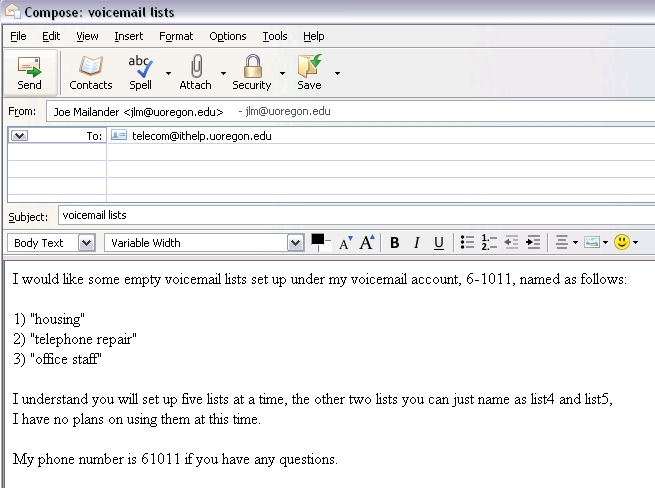
To request lists, send an email message to Telecom requesting voicemail lists. We usually assign five empty lists at a time; if you need more than that please indicate your requirements in the email message. We can also name some or all of the lists for you if you like, to make them more descriptive than just "list1, list2, etc.". Also, be sure and let us know what your UO extension is so we can assign these lists to your voicemail account.
Here's what such an email might look like:
Wait for confirmation back from Telecom that your lists have been set up. Each list will have a descriptive name, e.g. "housing" and a number associated with it, something like "07201". The number is what you use when addressing voicemail to the list.
- Managing your lists (adding and removing recipients). You can do this using the phone or the web interface, both are described here:
- Using the Telephone
Before you start, it's helpful to have the name and numbers of your lists. The easiest way to get that information is using the web interface (instructions just below)
- Call the voicemail system. From a UO telephone, the number is 6-1111.
- Login as you normally would as if you're checking for voicemail
- Press 5 then 2 then 3.
If you know the number of the distribution list, enter it now.
If you don't know the numbers of your distribution lists, you can press # and callXpress will read off the lists you own. If you have taken the time to record a name for these lists (recommended), callxpress will read off the name of the list rather than the number (e.g. "housing" rather than "07201").
- At this point you're managing the particular list you selected in the previous step. Your options here are:
- Press 1 to add members.
You're prompted to enter the mailbox numbers (phone extensions) of those you want to add to the list. The system has a directory function that allows you to look up extensions based on the spelling of the recipient's last name.
- Press 2 to remove members
- Press 3 to list current members in this list
- Press 4 to record a name for this list. If you haven't already done this, it is helpful to have this recorded.
- The * (asterisk) key will take you up one menu, so you're back at step 3, above, if you want to manage a different list.
- Using the web interface
Begin by logging into the web interface (only available from a UO network):
- Open https://voiceweb.uoregon.edu
- Enter your extension and security code
- Once logged in, click on the Personal Settings link on the left
- Click on the Distribution Lists tab. Here's a sample showing the example lists we had set up above:
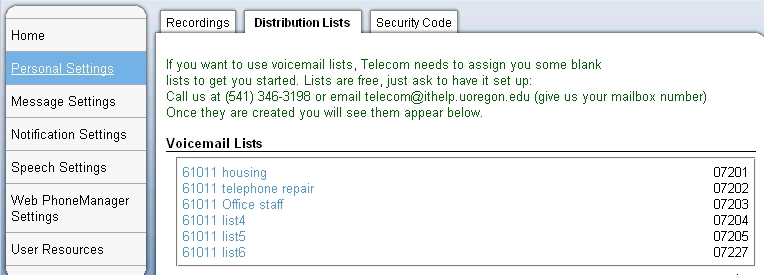
Note that the screen shows the names of the lists (housing, etc.) to the left and the corresponding list numbers to the right (07201, etc.). You may notice Telecom puts your voicemail box as the first part of any list name. We do that to help us track who owns which list. The actual number of the list, which you use to address voicemail to the list, is on the right and always begins with a zero (e.g. 07201)
- Click on the name of the list you want to manage, we'll click on "housing", which is list number 07201:
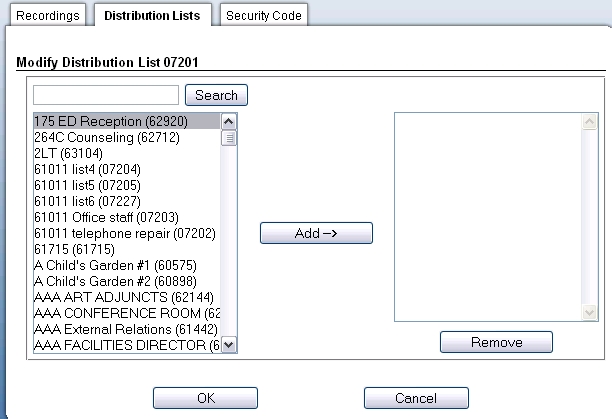
- You'll notice a directory listing on the left and a box on the right, which lists entries in this list. In the example above there is nobody yet in my housing list so it's empty. Let's add some recipients to this list
- Adding names
The list on the left only shows 200 names at a time (note you can scroll down to see all 200). Chances are the name you want won't be listed there as the UO has close to 5,000 voicemail boxes.
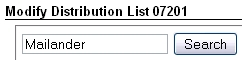
The way to find and display the name you need is to type in the last name of the person you seek in the box left of the Search button, then click Search. You can also search by extension if you know it.
Let's search for Joe Mailander. Enter the last name then click "Search":
The results are:
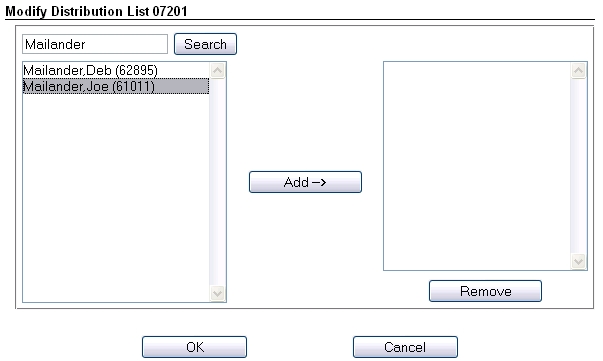
Assuming you see the person you're interested in, click on that name and click on the Add button. The name appears in the rightmost box, indicating that extension has been added to your voicemail list. Here's the list with Joe Mailander added (note the name now appears on the right):
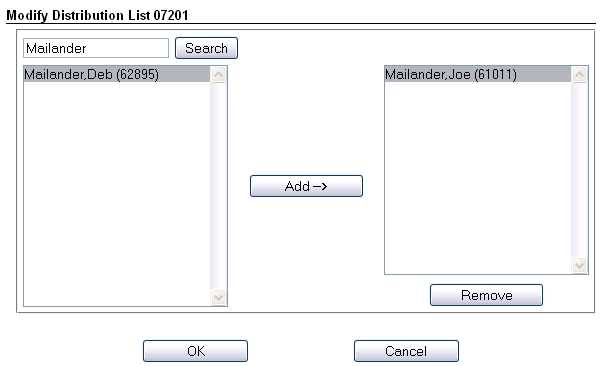
You can repeat this process (typing in the last name of the person you seek, clicking Search, and adding to your list) until you have everyone you want in your list. A list can contain up to 200 members. If you need more than 200 recipients in your voicemail list, contact Telecom (information listed below) for options.
Important! When you're done adding to your list, click the OK button: 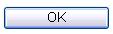 or none of your changes will be saved! or none of your changes will be saved!
- Removing names:
The process is similar to adding names. Click on the list you want to edit, but this time click on the name in the rightmost box so it's highlighted in blue, then click the Remove button. Here's an example removing Joe Mailander from the list:
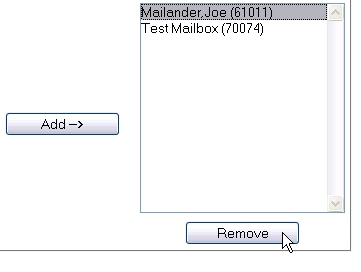
Important! When you're done removing from your list, click the OK button: or none of your changes will be saved!
- Sending voicemail to your list
To send a voicemail message to your list, you need to know the number of the list, which will begin with "07". In the example above, my "housing" list is number 07201. Your list numbers will be unique to you, but will start with 07. The easiest way to remind yourself what your list numbers are is to log into the web interface, click on Personal Settings, and then the Distribution Lists tab (as shown above). The window will show the list names and the 5-digit number, beginning with 07, that corresponds to that list. You can print that page to have as a reference.
- Call the voicemail system and login, as if you were checking for new voicemail messages.
- When you're prompted "To record and send voicemail, press 1", press 1.
- You are asked to record your message, then press # to approve or press 1 to edit. If you think you did a good job recording your voicemail message press #, else you can press 1 and have some options to review and redo it. Regardless, once you've approved what you've recorded you're prompted:
- Enter destination and # sign. Here's where you enter your mailing list number, 07XXX, where the 07 number corresponds to your particular list you want to use. For my "housing" list example I'd put in 07201, then #. CallXpress will say "<your list> has been added".
- You're asked to enter another destination and #. Assuming you're just sending your message to your list and no other recipients, go ahead and just enter a #.
- You're prompted to "press # to send" - go ahead and enter a #. Message will be sent at this point
To summarize, login to voicemail, press 1 to record a message, press # to approve, address it to your list followed by # # #.
|